Tomatoes in Dutch Buckets can be a game-changer for beginners, especially when traditional soil growing often leads to inconsistent watering, root diseases, and nutrient imbalances. Many growers are turning to Dutch bucket hydroponic systems as a more reliable and beginner-friendly way to grow healthy, high-yield tomatoes.
A Dutch bucket system uses drip irrigation and inert growing media to create the well-oxygenated, well-drained root zone that tomato plants need to thrive. Compared with soil or water-based systems, Dutch buckets give better control over nutrients, moisture, and plant support, making them particularly suitable for fruiting crops like tomatoes.
In this complete beginner’s guide, you will learn how Dutch bucket systems work, how to plan and set up a tomato Dutch bucket system, how to select the right tomato varieties and growing media, and how to manage nutrients, lighting, temperature, pruning, and common problems from planting to harvest. Whether you are growing on a balcony, in a backyard, or inside a greenhouse, this guide will help you build a stable, productive, and beginner-friendly hydroponic tomato system with confidence.
Why Dutch Buckets Are Ideal for Growing Tomatoes

Tomatoes are one of the most rewarding crops to grow, but they are also one of the easiest for beginners to struggle with. In traditional soil growing, problems such as root diseases, inconsistent watering, and nutrient lockout are very common. These issues often appear suddenly and can be difficult to fix once the plant starts to decline.
This is where a Dutch bucket hydroponic system offers a more stable and forgiving growing environment.
Common Problems in Soil-Grown Tomato Cultivation for Beginners
When tomatoes are grown in soil, the root zone is largely out of the grower’s control. Poor drainage can leave roots sitting in water for too long, reducing oxygen availability and increasing the risk of root rot. On the other hand, soil can dry out unevenly, causing stress that affects nutrient uptake and fruit development.
Another challenge is nutrient consistency. Even when fertilizers are applied correctly, nutrients in soil can become unavailable due to pH imbalance or salt buildup. As a result, tomato plants may show deficiency symptoms despite regular feeding, which is especially frustrating for beginners.
Essential Root Conditions for Healthy Tomato Growth
Healthy tomato plants depend on a stable root environment. Their roots require sufficient oxygen to support strong growth, efficient drainage to prevent waterlogging, and a steady supply of nutrients throughout the growing cycle. During flowering and fruiting, even small fluctuations in water or nutrient availability can lead to poor fruit set, blossom drop, or reduced yields.
Creating these conditions consistently is difficult in soil, but much easier in a controlled hydroponic system.
How Dutch Bucket Systems Improve Nutrient and Water Management
A Dutch bucket system uses drip irrigation combined with inert growing media to create an ideal balance of moisture and air in the root zone. The growing media provides physical support for large, fruit-heavy tomato plants while allowing excess nutrient solution to drain away quickly.
Because nutrients are delivered through a controlled drip system, tomatoes receive a consistent and predictable feed. This level of control helps prevent overwatering, reduces nutrient imbalances, and keeps roots healthy and well oxygenated. Compared to soil or fully water-based systems, Dutch buckets offer a practical middle ground that is especially well suited for fruiting crops like tomatoes.

Who Should Start Growing Tomatoes With Hydroponic Buckets
Dutch bucket systems are a great choice for growers who want higher yields and more consistency than soil growing can offer. They work well for home gardeners, greenhouse growers, and small commercial operations that are ready to manage basic nutrient and irrigation settings. For beginners who are willing to learn simple monitoring practices such as checking pH and EC, Dutch buckets provide a reliable and scalable way to grow tomatoes successfully.
Situations Where Dutch Buckets May Not Be the Best Choice
While Dutch buckets are beginner-friendly, they are not ideal for every situation. If reliable electricity or water access is not available, maintaining a drip irrigation system can be challenging. Growers who prefer a very low-maintenance or short-term growing setup may find simpler hydroponic systems easier to manage.
Dutch buckets also require some attention to nutrient management, so they may not be suitable for beginners who are not ready to learn basic hydroponic feeding principles.
Understanding How a Dutch Bucket Hydroponic System Works


To grow tomatoes successfully in a Dutch bucket system, it helps to understand what is happening in the root zone. Dutch buckets are not just containers with drip lines. They are designed to create a controlled growing environment that balances water, oxygen, and nutrients in a way tomatoes naturally prefer.
How Dutch Buckets Support Tomato Roots With Drip Irrigation Systems
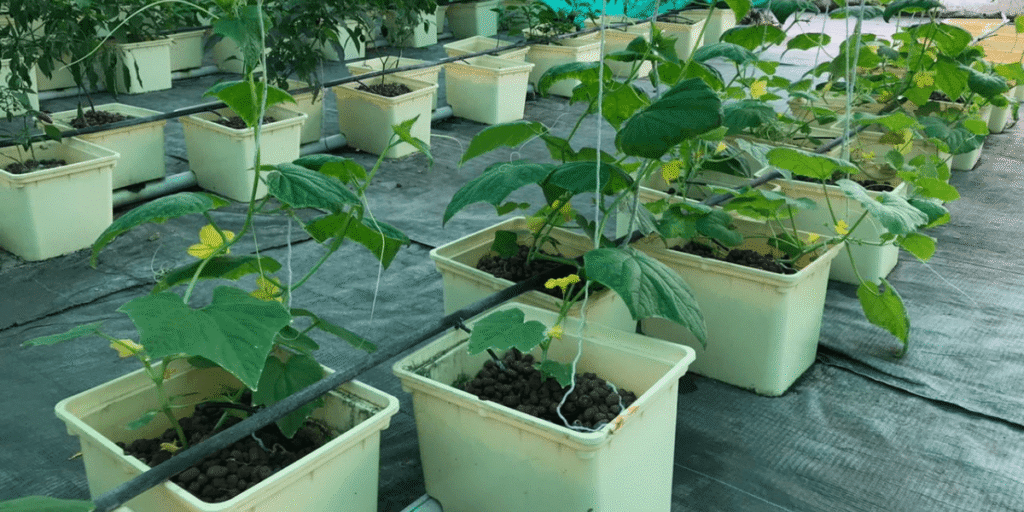
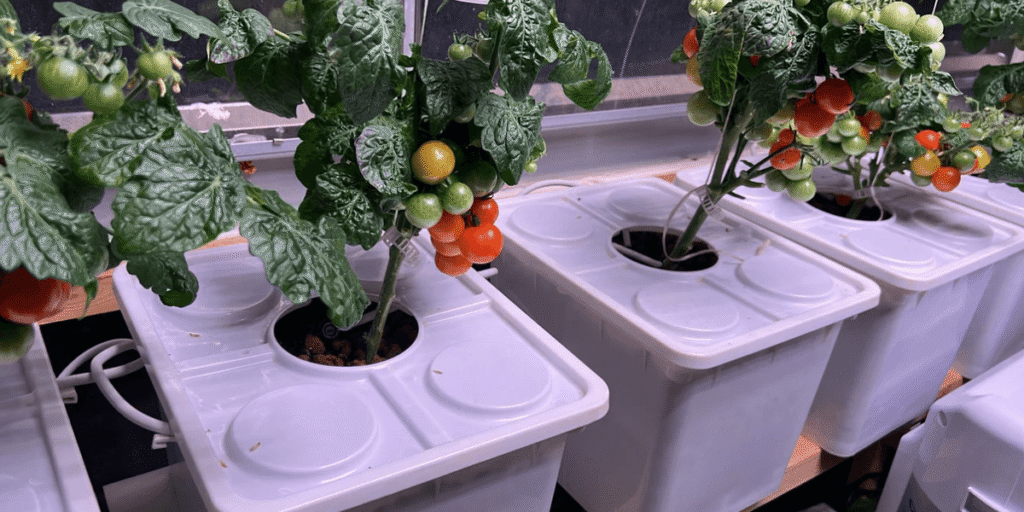
A Dutch bucket system combines drip irrigation with inert growing media such as perlite, coco coir, or a mix of both. Nutrient solution is delivered directly to the base of each plant through a drip emitter, slowly saturating the growing media. Excess solution then drains out through a raised outlet, preventing water from pooling around the roots.
Because the growing media does not contain nutrients, the plant receives everything it needs from the nutrient solution. This allows the grower to control feeding levels precisely while maintaining excellent drainage and root support. The result is a stable root zone that supports strong vegetative growth and heavy fruit production.
The Importance of Wet–Dry Cycles for Tomato Health and Yield
One of the key advantages of a Dutch bucket system is the natural wet–dry cycle it creates in the root zone. After each irrigation event, the growing media holds enough moisture for the plant while excess water drains away. As the media slowly dries, fresh air is pulled into the root zone.
Tomato roots respond very well to this cycle. Oxygen availability increases root activity, improves nutrient uptake, and reduces the risk of root disease. In contrast, roots that remain constantly submerged or overly saturated tend to become weak and more susceptible to stress and pathogens.
This balance between moisture and oxygen is one of the main reasons Dutch buckets are so effective for fruiting crops.
Root Oxygenation Compared With DWC and NFT Hydroponic Systems
Compared to other hydroponic systems, Dutch buckets provide a different approach to root oxygenation. In Deep Water Culture systems, roots are submerged in nutrient solution and rely heavily on air stones or diffusers for oxygen. While this can work well for leafy greens, it becomes less forgiving for large, fruiting plants like tomatoes if oxygen levels drop.
NFT systems keep roots in a thin film of nutrient solution, but they offer limited root support and are sensitive to pump failure. Tomato plants can quickly suffer stress if nutrient flow is interrupted.
Dutch bucket systems sit between these two approaches. Roots are never fully submerged, oxygen is naturally available through the growing media, and plants are physically supported as they grow larger. This makes Dutch buckets more stable and forgiving for long-term tomato production.
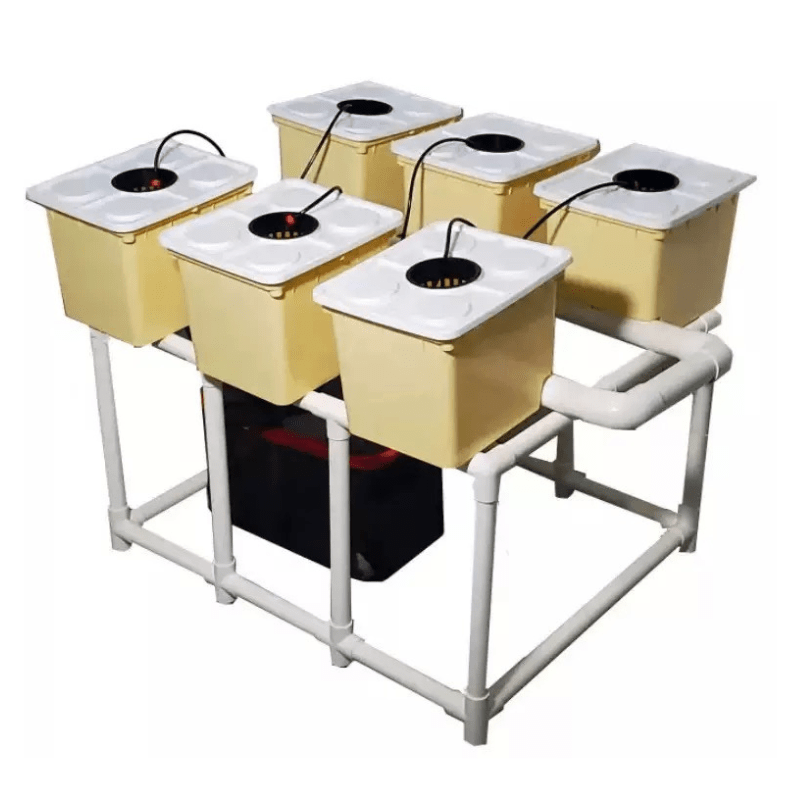
Recirculating vs Non-Recirculating Dutch Bucket Systems

Once you understand how Dutch buckets work, the next decision is choosing between a recirculating system and a non-recirculating system. Both can grow tomatoes successfully, but they serve different needs and experience levels.
Advantages and Limitations of Recirculating Hydroponic Setups
In a recirculating Dutch bucket system, excess nutrient solution drains back into a central reservoir and is reused. This setup is more water-efficient and reduces nutrient waste, which can be beneficial for larger or commercial operations.
However, recirculating systems require closer monitoring. Changes in pH, EC, or root health can affect the entire system. If disease or root pathogens enter the reservoir, they can spread quickly to all plants. Regular testing and sanitation are essential.
Pros and Cons of Non-Recirculating Dutch Bucket Systems
Non-recirculating systems, often called drain-to-waste systems, allow excess nutrient solution to drain away instead of returning to the reservoir. This approach provides more stability in nutrient delivery and reduces the risk of disease spreading between plants.
For beginners, non-recirculating systems are easier to manage because each plant receives fresh nutrient solution at every irrigation cycle. Mistakes in feeding are less likely to affect the entire system, making this setup more forgiving during the learning process.
The main drawback is higher water and nutrient usage, but for small to medium tomato systems, this is usually manageable.
Comparing Disease Spread Risks Between Recirculating and Static Systems
From a plant health perspective, disease control is a key consideration. Recirculating systems carry a higher risk of spreading root diseases if problems arise. Non-recirculating systems isolate each plant’s root zone, which helps limit the impact of root-related issues.
For growers focused on reducing risk and simplifying management, this difference is important.
Recommended Dutch Bucket System Configuration for Beginners
For most beginners, a non-recirculating Dutch bucket system is the best place to start. It offers greater stability, lower disease risk, and simpler nutrient management. Once growers gain experience and confidence, transitioning to a recirculating system can improve efficiency and reduce long-term operating costs.
Understanding these fundamentals allows you to use a Dutch bucket system effectively rather than copying a setup without knowing why it works. This becomes especially important as tomato plants mature and enter heavy fruiting stages.
For growers who want a reliable starting point, a complete Dutch bucket kit designed for beginner setups can simplify the process by providing compatible components and a proven system layout.
Greenfuturehydro Dutch Bucket DWC System – Cannabis, Tomatoes & Herbs | Bulk Supply
System Design and Planning Before Buying Equipment
One of the most common mistakes beginners make with Dutch bucket systems is buying equipment before planning the layout. Tomatoes are long-term, high-growth plants, and once the system is installed, design flaws are difficult to fix. A few smart decisions at the planning stage can save time, money, and frustration later.
Space and Layout Considerations for Balcony, Backyard, and Greenhouse Growing
The way you design your Dutch bucket system should match where you are growing.
On a balcony, space is usually limited, so vertical growth becomes the priority. Buckets should be arranged in a single row or along walls, with enough room to access each plant for pruning and harvesting. Wind exposure and weight load are also important factors to consider.
In a backyard or garden setting, horizontal spacing matters more. Buckets should be positioned to allow full sun exposure and good airflow between plants. Leaving enough space for walking and maintenance helps prevent overcrowding and disease issues.
In a greenhouse, layout efficiency and scalability become key. Buckets are often arranged in straight rows with consistent spacing, allowing uniform irrigation and easier system expansion. Planning pathways and access points in advance is essential for long-term operation.
How Much Space Each Tomato Plant Needs in a Hydroponic Setup
Tomato plants grown in Dutch buckets require more space than many beginners expect. Most varieties perform best when each plant has about 40 to 60 centimeters of horizontal space. This allows proper airflow, light penetration, and room for training and pruning.
Crowding plants too closely may seem efficient at first, but it often leads to reduced yields, higher disease pressure, and difficult maintenance as the plants mature.
Expansion Challenges Beginners Often Overlook
Many beginners design a system only for their current needs, without thinking about future expansion. Reservoir size, pump capacity, and plumbing layout should allow room for additional buckets later.
If the system is built at maximum capacity from the start, adding more plants usually requires replacing key components rather than making simple upgrades. Planning for expansion early keeps the system flexible and cost-effective.

Dutch Bucket Size and Drainage Design
Bucket size and drainage design play a major role in root health and fruit production. These details are often overlooked but can directly affect tomato yield.
How Bucket Dimensions Affect Tomato Yield and Root Zone Health
Tomatoes develop large, active root systems, especially during fruiting. Buckets that are too small restrict root growth, limit nutrient uptake, and reduce the plant’s ability to support heavy fruit loads.
Most tomato plants perform best in buckets with a capacity of around 10 to 20 liters or more. A larger root zone provides better moisture stability and supports consistent growth throughout the season.
Drain Outlet Height and Its Effect on Root Aeration and Moisture
The height of the drain outlet determines how much nutrient solution remains in the bucket after each irrigation cycle. A properly positioned outlet allows excess solution to drain while leaving a small moisture reserve in the growing media.
If the outlet is too low, the root zone may dry out too quickly. If it is too high, water can accumulate and reduce oxygen availability. Finding the right balance is essential for healthy roots and steady nutrient uptake.
Typical Issues Caused by Poor Drainage Design in Hydroponic Tomatoes
Improper drainage is one of the most common causes of failure in Dutch bucket tomato systems. Poorly designed drainage can lead to waterlogged roots, oxygen deficiency, salt buildup in the growing media, and increased risk of root disease.
These problems often appear gradually and are difficult to correct once the plants are established. Designing the drainage system correctly from the beginning helps ensure long-term stability and higher yields.


Choosing the Right Growing Media for Hydroponic Tomatoes
Growing media plays a critical role in the success of a Dutch bucket tomato system. While nutrients and irrigation often get the most attention, the growing media directly affects root health, oxygen availability, and long-term plant stability. Choosing the wrong media can lead to poor growth, stress, and avoidable root problems.
Key Growing Media Properties for Optimal Tomato Root Health
Tomato roots need a balance of moisture and air to function properly. A good growing media should hold enough water to support steady growth while allowing excess solution to drain quickly. This balance ensures that oxygen can move freely through the root zone, which is essential for nutrient uptake and root activity.
Support is another important factor. As tomato plants mature and begin producing fruit, their weight increases significantly. The growing media must be able to anchor the plant securely and prevent root movement or collapse, especially in taller or heavily pruned systems.
Salt accumulation is also a concern in hydroponic systems. Some growing media retain salts more easily than others, which can lead to nutrient imbalances over time. Media that allows excess salts to flush out easily helps maintain a healthier root environment.
Comparing Popular Media: Coco Coir, Perlite, Clay Pebbles
| Growing Medium | Water Retention | Aeration | Root Support | Beginner Difficulty | Best Use Case |
|---|---|---|---|---|---|
| Perlite | Low | Excellent | Medium | ⭐⭐ | Growers with consistent drip irrigation |
| Coco Coir | High | Moderate | Strong | ⭐⭐⭐ | Systems with less frequent watering |
| Coco Coir + Perlite Mix | Balanced | High | Strong | ⭐ | Best all-around choice for beginners |
| Clay Pebbles (LECA) | Very Low | High | Weak | ⭐⭐⭐⭐ | Not recommended as a standalone medium |
Beginner Tips for Selecting Hydroponic Growing Media
If you’re just starting with a Dutch bucket system for tomatoes, a coco coir + perlite mix offers the most stable root environment. It balances moisture retention, oxygen availability, and plant support three factors that directly affect tomato yield and plant health.
Using perlite alone works well in automated systems, while coco coir alone requires closer EC management. Clay pebbles, although popular in hydroponics, are better used as a supplement rather than the main growing media for fruiting tomatoes.
Selecting Tomato Varieties for Dutch Bucket Hydroponics
Not all tomato varieties are suitable for hydroponic growing. In a Dutch bucket system, plant size, growth habit, and fruit load all affect system stability and long-term yields. Choosing the right tomato type from the beginning makes the system easier to manage and far more forgiving for beginners.
Differences Between Determinate and Indeterminate Tomato Varieties
| Feature | Determinate Tomatoes | Indeterminate Tomatoes |
|---|---|---|
| Growth habit | Grow to a fixed height and stop | Continue growing throughout the season |
| Typical plant size | Compact and bushy | Tall and vigorous |
| Pruning difficulty | Low | Moderate to high |
| Support requirements | Basic staking or short trellis | Strong vertical support or string system |
| Harvest pattern | Short, concentrated harvest | Continuous harvest over time |
| Suitability for Dutch buckets | Good for small systems | Ideal for long-term, high-yield systems |
| Beginner friendliness | High | Medium (with proper guidance) |
Beginner tip:
If you want minimal pruning and a shorter growing cycle, determinate tomatoes are easier to manage. If you want higher yields and are willing to learn pruning and training, indeterminate tomatoes are a better long-term choice for Dutch bucket systems.


Cherry, Roma, and Large Fruit Tomatoes Suitable for Hydroponic Buckets
| Tomato Type | Difficulty Level | Why It Works Well | Key Considerations |
|---|---|---|---|
| Cherry tomatoes | Easy | Fast growth, strong tolerance, lighter fruit load | Ideal for beginners and small systems |
| Roma / plum tomatoes | Easy to moderate | Balanced growth, medium fruit size | Require consistent feeding during fruiting |
| Large-fruited tomatoes | Moderate to advanced | High yield potential | Need strong support and precise nutrient control |
| Greenhouse tomato varieties | Moderate | Bred for controlled environments and long harvest cycles | Best for greenhouse Dutch bucket setups |
How to Pick the Right Tomato Varieties for Your Setup
For most beginners, cherry tomatoes or Roma tomatoes are the safest and most reliable options when starting with a Dutch bucket system. These varieties adapt well to hydroponic conditions and are more forgiving of small mistakes in feeding or irrigation.
Indeterminate greenhouse varieties are an excellent choice for growers who plan to grow tomatoes long-term and want consistent harvests, especially in greenhouse environments with good climate control.
Large-fruited tomatoes can be grown successfully, but they are better suited for growers who already understand nutrient management, pruning, and plant support in Dutch bucket systems.


Step-by-Step Guide to Building Your Dutch Bucket System
Drip Irrigation Setup for Consistent Tomato Growth
A Dutch Bucket system depends heavily on proper drip irrigation. Tomatoes need steady moisture, but their roots must stay well oxygenated. Too much water or poor distribution can quickly lead to root stress, disease, and uneven growth across the system.
For most tomato Dutch Bucket setups, drip emitters in the 2–4 L/h range provide the best balance. Lower flow rates may struggle in warm climates, while very high flow rates can oversaturate the root zone and create oxygen shortages. Pair moderate-flow drippers with multiple short irrigation cycles per day instead of long, infrequent watering sessions.
Uneven water pressure is one of the most common beginner mistakes. Buckets closest to the pump often receive more water, while those at the end of the line dry out. This can be minimized by using pressure-compensating drippers, keeping drip lines similar in length, and running a larger main supply line before branching to each bucket. Planning for future expansion at this stage prevents many problems later.
Common Drip Irrigation Mistakes Made by Beginners
Many irrigation-related problems are mistaken for nutrient deficiencies or poor plant genetics. In reality, they usually come from small setup errors.
Common issues include using low-quality garden drippers instead of irrigation-grade emitters, running pumps continuously without a timer, allowing drip lines to sag and trap air, and skipping filtration entirely. Any of these mistakes can cause inconsistent feeding, clogged emitters, and stressed plants long before visible symptoms appear.
Getting the irrigation system right early saves time, nutrients, and frustration throughout the growing season.
How to Size Your Water Reservoir for Hydroponic Tomatoes
The size of your nutrient reservoir directly affects system stability. Small tanks heat up faster, experience faster EC and pH swings, and require more frequent adjustments.
As a general guideline, each tomato plant in a Dutch Bucket system consumes approximately 4–6 liters of nutrient solution per day. A system with 10 plants should have at least a 60–80 liter tank, while 20 plants benefit from a 120–150 liter reservoir. Oversizing the tank whenever possible leads to more consistent nutrient delivery and healthier root systems.
Choosing the Proper Water Pump for Your Dutch Bucket System
A larger pump does not automatically mean better performance. The goal is reliable flow at the correct pressure.
For small systems with 6–10 buckets, pumps rated around 800–1200 L/h are usually sufficient. Medium setups with 12–24 buckets often perform best with 1500–2500 L/h pumps, while greenhouse-scale systems may require 3000 L/h or more. Always check the pump’s lift height, continuous-duty rating, and noise level if the system is used indoors or on a balcony.
Importance of Filtration in Dutch Bucket Hydroponics
Drip emitters clog easily, even when the nutrient solution looks clean. Fertilizer residues, biofilm, and fine media dust especially from coco coir slowly build up inside the system.
Installing a simple inline mesh filter (120–150 mesh) before the drip lines dramatically reduces clogging and maintenance. Skipping filtration may save money initially, but it often leads to plant loss and uneven watering later in the season.
Final Setup Advice to Ensure Stable and High-Yield Growth
Most Dutch Bucket tomato failures are not caused by poor nutrients, weak lighting, or unsuitable tomato varieties. They are almost always linked to water delivery problems.
If you take the time to design your drip flow rate, pressure balance, reservoir size, pump selection, and filtration correctly from the beginning, your system will already outperform the majority of beginner setups. A stable water system creates stable roots, and stable roots grow productive tomatoes.
Once the system is running reliably, the next step is refining how tomatoes grow within it. For a deeper look at plant spacing, pruning methods, nutrient strategies, and long-term plant care, you can explore our Dutch bucket tomato growing guide.
Tomato Nutrient Solution Management for Beginners

Managing nutrients for tomatoes in a Dutch Bucket system doesn’t need to be complicated. Most beginner mistakes come from trying to fine-tune too early. Tomatoes are fairly forgiving as long as their nutrient strength and pH stay within a stable range and match the plant’s growth stage.
Understanding how nutrient needs change over time helps you avoid overfeeding, nutrient lockout, and inconsistent fruit production.
Nutrient Needs During Vegetative, Flowering, and Fruiting Stages
Tomatoes do not require the same nutrient balance throughout their life cycle. Adjusting nutrient strength gradually is more effective than making large, sudden changes.
During the vegetative stage, tomato plants focus on leaf, stem, and root development. A slightly nitrogen-forward nutrient profile supports strong early growth and canopy development. At this stage, moderate EC levels encourage steady growth without pushing the plant too hard.
When tomatoes enter the flowering stage, nutrient demand increases, but balance becomes more important than strength. Excess nitrogen during flowering can delay fruit set and promote excessive leaf growth. Maintaining stable potassium and micronutrient availability supports flower formation and pollination.
In the fruiting stage, tomatoes become heavy feeders. Potassium demand rises significantly, and consistent calcium uptake becomes critical to prevent blossom end rot. Rather than sharply increasing EC, maintaining steady nutrient delivery with proper irrigation usually produces better results.
Monitoring and Adjusting EC and pH in Hydroponic Tomatoes
Electrical conductivity (EC) and pH are two of the most important indicators of nutrient stability in hydroponic tomato growing.
For most Dutch Bucket tomato systems, a pH range of 5.8–6.5 provides optimal nutrient availability. EC levels typically fall between 2.0–3.5 mS/cm, depending on growth stage, plant size, and environmental conditions. Beginners should stay near the middle of this range and avoid pushing EC too high too quickly.
Testing frequency matters more than chasing perfect numbers. Checking EC and pH two to three times per week is usually sufficient for small to medium systems. Sudden changes often indicate water uptake issues, temperature swings, or irrigation inconsistencies rather than true nutrient deficiencies.

Greenfuturehydro pH Tester for Hydroponics & Greenhouse – OEM/ODM
Common Beginner Mistakes in Nutrient Management
One of the most common mistakes new growers make is adjusting EC or pH too aggressively. Overcorrecting can stress plants more than slightly imperfect values.
Another frequent issue is constantly changing nutrient formulas instead of allowing the plant time to respond. Tomatoes show nutrient-related symptoms slowly, and frequent changes often create instability rather than improvement.
Water quality also plays a role. Hard water, high bicarbonates, or inconsistent source water can affect pH stability over time. Understanding your base water helps prevent recurring adjustment cycles.
Practical Tips for Maintaining Stable Tomato Growth
For beginners, consistency matters more than precision. Using a reliable tomato-specific hydroponic nutrient, maintaining stable irrigation, and making small adjustments gradually will produce better results than chasing maximum EC levels.
If your plants are growing evenly, flowering consistently, and setting fruit without visible stress, your nutrient program is already working. Stable roots and stable water delivery allow tomatoes to regulate their own nutrient uptake more effectively.
Light, Temperature, and Environmental Control for Tomatoes


Even with a well-built Dutch Bucket system and perfect nutrient management, tomatoes will not reach their full potential without the right environmental conditions. Light, temperature, and humidity work together to determine not just plant health, but final yield and fruit quality.
Many beginners focus on equipment first, but environmental stability often makes a bigger difference than expensive upgrades.
Simplified Guide to Daily Light Requirements (DLI) for Hydroponic Tomatoes
Tomatoes are high-light crops. What matters most is not just how bright the light looks, but how much usable light the plant receives over the course of the day.
A simplified way to think about this is Daily Light Integral (DLI). For productive tomato plants, a DLI in the range of 20–30 mol/m²/day supports strong growth, consistent flowering, and good fruit development. Below this range, plants may survive, but yields will suffer.
In greenhouses, natural sunlight often provides most of the required DLI, but supplemental grow lights can be critical during winter, cloudy periods, or in high-latitude regions. Adding low to moderate-intensity lighting to extend day length is usually more effective than trying to dramatically increase light intensity for short periods.
Common signs of insufficient light include slow growth, long internodes, pale leaves, delayed flowering, and poor fruit set. These symptoms are often misdiagnosed as nutrient problems when the real issue is light limitation.
Temperature and Humidity Management for Healthy Tomato Plants
Tomatoes perform best within a relatively narrow temperature range. Daytime temperatures between 22–26°C (72–79°F) support active growth, while nighttime temperatures around 16–20°C (61–68°F) help maintain steady flowering and fruit development.
High temperatures, especially when combined with high humidity, can interfere with pollen viability and reduce successful pollination. This often results in flowers dropping without setting fruit. On the other hand, cool nights or large temperature swings can slow growth and delay ripening.
Humidity control is equally important. A relative humidity range of 60–70% allows efficient transpiration without stressing the plant. Excessively high humidity increases the risk of fungal diseases, while very low humidity can lead to calcium uptake issues and poor fruit quality.
Good airflow, adequate spacing, and consistent ventilation are key tools for managing both temperature and humidity in Dutch Bucket tomato systems.
Environmental Factors That Affect Pollination and Disease
Pollination problems in tomatoes are often environmental rather than nutritional. High heat, poor air movement, or unstable humidity can all reduce pollen release and transfer.
Simple measures such as improving airflow, gently shaking plants, or using circulating fans can significantly improve fruit set, especially in greenhouses or indoor growing spaces.
Disease prevention also starts with environmental control. Stable temperatures, controlled humidity, and dry leaf surfaces reduce the likelihood of fungal infections far more effectively than reactive treatments. When the environment stays within optimal ranges, tomatoes can allocate more energy to growth and fruit production instead of stress response.
Beginner-Friendly Tips for Optimizing Climate Conditions
For beginners, the goal is consistency rather than perfection. Maintaining light exposure, temperature, and humidity within a stable range will always outperform chasing extreme conditions.
If your plants show steady growth, regular flowering, and uniform fruit development, your environment is already supporting high yields. Fine-tuning can come later, once the basics are stable and predictable.
Tomato Pruning, Training, and Support Systems

Tomatoes grown in Dutch Bucket systems are vigorous by nature. With constant access to water, nutrients, and oxygen, plants can quickly become unmanageable without proper pruning and support. Learning how to guide growth early makes the difference between a productive system and an overcrowded one.
Pruning and training are not about forcing plants to grow a certain way. They are about directing energy toward fruit production while keeping the root zone, airflow, and light exposure balanced.
Single-Stem vs Double-Stem Training Methods for Hydroponic Tomatoes
Single-stem training is the most beginner-friendly option for Dutch Bucket tomatoes. By maintaining one main growing stem, plants are easier to manage, airflow remains strong, and nutrient distribution is more predictable. This method works especially well in limited spaces, greenhouses, and vertical systems.
Double-stem training allows one additional side shoot to develop into a second main stem. While this can increase total yield, it also increases pruning complexity, support requirements, and nutrient demand. For beginners, double-stem systems are best attempted only after gaining experience with single-stem pruning.
In most Dutch Bucket setups, consistent single-stem training leads to healthier plants and more uniform fruit development.
Timing and Techniques for Removing Side Shoots
Side shoots, often called suckers, appear in the joint between the main stem and leaf branches. Removing them early prevents the plant from diverting energy away from fruit production.
The ideal time to remove side shoots is when they are small and soft, usually under 5 cm in length. Early removal minimizes plant stress and reduces the risk of disease entry. Waiting too long makes pruning more aggressive and can slow growth temporarily.
Regular inspection is key. A quick weekly check prevents excessive side shoot growth and keeps the plant structure clean and open.
Vertical Training and String Support Systems for Tomatoes
Vertical training is the most effective way to support Dutch Bucket tomatoes. String trellis systems allow plants to grow upward while keeping stems straight and well supported.
Using overhead support wires with strong, adjustable strings makes it easy to guide growth and manage height over time. As the plant grows, the stem can be gently wrapped or clipped to the string, providing stability without restricting movement.
Compared to rigid cages or stakes, string systems offer better airflow, easier pruning access, and more flexibility in controlled environments like greenhouses or indoor growing spaces.
Managing Plant Height and Long-Term Growth in Dutch Buckets
Tomatoes can quickly outgrow their available space if height is not managed properly. Instead of allowing plants to hit the ceiling, growers often use gradual lowering and leaning techniques, where the base of the plant is shifted slightly while the top continues growing upward.
Another common method is topping the plant once the desired number of fruit clusters has formed. This directs energy toward ripening existing fruit rather than producing new growth.
Height control is not about limiting yield, but about maintaining balance. Well-managed plants are easier to maintain, less prone to disease, and more productive over time.
Practical Pruning Tips for Hydroponic Beginners
For beginners, consistency matters more than perfection. Regular light pruning, early side shoot removal, and stable vertical support prevent most structural problems before they begin.
If your plants are easy to access, leaves receive good light, and fruit clusters develop evenly, your pruning and training strategy is working. Once the system feels predictable, more advanced techniques can be introduced gradually.
Pollination and Fruit Set Management in Hydroponic Tomatoes
In hydroponic systems, tomatoes often grow fast, look healthy, and produce plenty of flowers yet fail to set fruit. This issue is especially common in Dutch Bucket systems, greenhouses, and indoor setups where natural pollination factors are limited.
Understanding why pollination fails is the first step to fixing fruit set problems without overcorrecting nutrients or pruning.
Why Tomato Flowers Sometimes Fail to Set Fruit
Tomato flowers are self-fertile, but they still require the right environmental conditions for pollen to be released and transferred. In hydroponic environments, poor air movement, unstable temperatures, or improper humidity can prevent successful pollination.
High temperatures can reduce pollen viability, while excessive humidity causes pollen grains to clump instead of dispersing. On the other hand, very low humidity can dry out pollen before it reaches the stigma. Inconsistent light levels and plant stress also contribute to flower drop.
In many cases, nutrient levels are blamed, but the real issue is environmental imbalance rather than nutrient deficiency.
Manual vs Natural Pollination Techniques
In outdoor systems, wind and insects naturally handle pollination. In indoor or greenhouse Dutch Bucket systems, these factors are often absent or insufficient.
Manual pollination methods, such as gently shaking plants, tapping flower clusters, or using a small brush or electric pollinator, can significantly improve fruit set. These techniques are simple, low-cost, and effective for small to medium systems.
Natural pollination can be encouraged by improving airflow with circulating fans and maintaining open plant structure through proper pruning. In larger greenhouse setups, commercial growers may use bumblebees, but this approach is usually unnecessary for beginner systems.
Environmental Adjustments to Boost Tomato Fruit Set
Stable environmental conditions play a larger role in fruit set than any single intervention. Maintaining daytime temperatures between 22–26°C (72–79°F) and avoiding extreme heat during flowering helps preserve pollen performance and improve pollination success.
Relative humidity around 60–70% supports pollen release and transfer, while good airflow helps distribute pollen, strengthen plant stems, and reduce disease risk. In controlled environments, understanding hydroponic plant pollination allows growers to fine-tune airflow, humidity, and temperature for more consistent fruit set.
Consistent lighting and a stress-free growing environment further increase the likelihood of successful pollination. When plants are not struggling to survive, they can allocate more energy toward reproduction rather than recovery.
Practical Tips for Increasing Hydroponic Tomato Yield
For beginners, small changes often deliver the biggest improvements. Adding airflow, gently assisting pollination during peak flowering, and stabilizing temperature and humidity can quickly turn flowers into developing fruit.
If you see healthy flowers dropping without fruit formation, avoid immediately changing nutrients or EC levels. Focus on environmental conditions first. In most hydroponic tomato systems, fixing pollination issues restores fruit set faster than any nutrient adjustment.
Troubleshooting Common Dutch Bucket Tomato Issues
| Symptom | Most Likely Cause | What to Check First | Beginner Action |
|---|---|---|---|
| Lower leaves turning yellow | Mild nitrogen drawdown or natural aging | Irrigation consistency, EC trend | Observe before increasing nutrients |
| Whole plant yellowing | Root stress or pH imbalance | Root color, smell, pH range | Stabilize watering, adjust pH gradually |
| Slow growth | Low oxygen or inconsistent watering | Drip timing, drainage | Shorter, more frequent irrigation cycles |
| Flowers dropping | Heat, humidity, poor airflow | Temperature, RH, air movement | Improve ventilation, add airflow |
| Healthy flowers, no fruit | Pollination failure | Airflow, temperature | Manual pollination, stabilize environment |
| Roots turning brown | Early root rot | Drainage, irrigation duration | Reduce watering, improve aeration |
| Leaf tip burn | Salt accumulation | Runoff EC | Flush lightly, improve drainage |
| Uneven plant size | Uneven drip pressure | Dripper flow, line layout | Balance lines, use pressure-compensating drippers |
How to Use a Beginner-Friendly Troubleshooting Table
Start with the symptom you see most clearly.
Check water delivery and root conditions before adjusting nutrients or EC.
Make one change at a time and observe for several days.
Most Dutch Bucket tomato problems come from irrigation, oxygen, and environmental instability, not from missing nutrients.
Harvest Timing and Yield Expectations


Harvesting tomatoes at the right time affects not only flavor, but also overall plant productivity. In Dutch Bucket systems, consistent nutrients and controlled environments often lead to faster ripening, which means timing becomes even more important.
Understanding what to expect from each plant helps beginners avoid disappointment and plan future improvements more realistically.
When to Harvest Tomatoes for Best Flavor and Texture
Tomatoes taste best when they are harvested at the breaker to full-color stage, depending on the variety. At the breaker stage, the fruit has begun to change color but is still firm. Harvesting at this point allows tomatoes to finish ripening off the vine while maintaining good texture and shelf life.
For home growers, vine-ripened tomatoes with full color often deliver the best flavor. However, leaving fruit on the plant too long can slow down new fruit development and increase the risk of cracking or disease, especially in humid environments.
Regular harvesting encourages the plant to continue flowering and setting new fruit rather than focusing energy on fully mature tomatoes.
Realistic Yield Per Plant in Hydroponic Dutch Bucket Systems
Yield varies widely based on tomato type, pruning strategy, environment, and season length. In well-managed Dutch Bucket systems, cherry tomato plants often produce the highest number of fruits over time, while larger-fruited varieties yield fewer but heavier tomatoes.
As a general guideline, a healthy cherry tomato plant can produce 4–7 kg (9–15 lbs) of fruit per growing cycle. Medium-sized tomato varieties typically yield 3–5 kg (6–11 lbs) per plant, while large beefsteak tomatoes may produce 2–4 kg (4–9 lbs) under similar conditions.
These numbers assume stable irrigation, proper pruning, adequate light, and consistent nutrient management. Yield improves gradually as growers gain experience and fine-tune their systems.
How to Improve Yield in Subsequent Growing Cycles
Improving yield is rarely about pushing plants harder. It is about removing small limitations that quietly reduce performance.
Reviewing the previous cycle helps identify bottlenecks. Common improvement areas include optimizing light exposure, improving airflow during flowering, adjusting pruning timing, and stabilizing irrigation schedules. Root health should also be assessed between cycles, including checking for salt buildup or drainage issues.
Starting the next crop with clean equipment, fresh growing media, and a slightly larger or more stable nutrient reservoir often leads to noticeable yield improvements. Small upgrades made consistently over time produce better results than major changes introduced all at once.
Simple Harvest Tips for Beginners
For beginners, consistency matters more than chasing maximum size or perfect color. Harvest regularly, observe plant response, and adjust timing based on variety and growing conditions.
If plants continue flowering while fruit ripens evenly, your harvest strategy is supporting long-term productivity. Each growing cycle builds experience, making the next harvest easier and more rewarding.
Frequently Asked Questions About Hydroponic Tomatoes
For many growers, yes. Dutch Bucket systems provide better control over water, nutrients, and root-zone oxygen compared to soil. This stability reduces common soil-related problems such as root diseases, inconsistent moisture, and nutrient lockout. While soil can still produce good tomatoes, Dutch Buckets offer more predictable results, especially for beginners or growers working in controlled environments.
Most Dutch Bucket systems are designed for one tomato plant per bucket. Tomatoes develop large root systems and require space for proper oxygenation and nutrient uptake. Planting more than one tomato in a single bucket often leads to competition, uneven growth, and reduced yield.
Yes, Dutch Bucket systems can be used outdoors as long as they are protected from extreme weather. Outdoor systems benefit from natural sunlight and airflow, but growers should plan for rain protection, temperature control, and stable reservoir placement. In hot climates, shading and reservoir insulation help prevent overheating.
In Dutch Bucket systems, tomatoes typically reach harvest in 60–90 days after transplanting, depending on variety, temperature, and light levels. Cherry tomatoes often mature faster, while larger varieties take longer. Stable environments and proper pruning can slightly shorten harvest time.
Dutch Bucket systems are generally better suited for fruiting crops like tomatoes, cucumbers, and peppers. They provide strong root support, excellent drainage, and stable oxygen levels. DWC systems work well for leafy greens but can struggle with large, heavy plants due to root crowding and oxygen limitations over time.
Common Beginner Mistakes in Dutch Bucket Tomato Growing
| Beginner Mistake | Why It Causes Problems | Typical Symptoms | What to Do Instead |
|---|---|---|---|
| Overfeeding nutrients | Salt buildup stresses roots and blocks uptake | Leaf tip burn, slow growth, rising EC | Keep EC moderate and stable, adjust slowly |
| Ignoring airflow | High humidity reduces pollination and increases disease | Flower drop, weak stems, fungal issues | Improve ventilation and add circulation fans |
| Improper pruning | Energy diverted or photosynthesis reduced | Dense canopy or weak growth | Prune lightly and consistently |
| Keeping roots too wet | Low oxygen leads to root rot | Yellowing, wilting, root browning | Use short irrigation cycles with good drainage |
How to Use This Quick Reference Table to Avoid Mistakes
If multiple symptoms appear at the same time, always check irrigation and airflow first rather than immediately adjusting nutrients.
Improving root zone conditions and the growing environment often resolves issues without further changes.
For beginner growers, differences in system stability and tolerance for mistakes can significantly affect how often these problems occur. If you’re still comparing which setup is easier to manage, this Dutch Bucket vs DWC comparison guide explains how the two systems differ in root oxygenation, maintenance requirements, and daily management.

Why Dutch Buckets Are the Ideal System for Beginner Tomato Growers
For beginner tomato growers, Dutch Bucket systems offer a rare combination of stability, control, and long-term value. Compared with soil growing or more complex hydroponic setups, Dutch Buckets provide a consistent root environment, easier nutrient management, and fewer sudden failures. The system is simple to scale, easy to troubleshoot, and highly adaptable for both indoor and outdoor use. Over time, its reliable yields, efficient water use, and reusable components make Dutch Bucket hydroponics a smart, beginner-friendly investment for growing healthy, high-quality tomatoes.
Growing Dutch Bucket Tomatoes With Greenfuturehydro
If you’re new to growing tomatoes with a Dutch Bucket system, starting small is always the smartest move. A simple setup gives you the space to understand how tomatoes respond to nutrients, irrigation, and environmental changes without unnecessary pressure. As you gain experience, Dutch Bucket systems prove to be flexible, forgiving, and easy to scale from a few plants to a full greenhouse.
At Greenfuturehydro, we make Dutch bucket tomato growing simple, stable, and beginner-friendly. Our systems are designed for precise water and nutrient control, helping growers build healthier root zones, improve flowering, and achieve more consistent yields without overcomplicated setups. Whether you’re setting up a small grow area or planning to expand commercially, we’re here to help you choose equipment that’s reliable, easy to maintain, and ready to grow with you.
If you’d like guidance tailored to your space or production goals, feel free to reach out to our team.
📩 info@greenfuturehydro.com
📞 +86 13487543942
Follow us on Instagram @Greenfuturehydro for practical growing tips, real-world case studies, and step-by-step insights into hydroponic tomato production. Start small, grow with confidence, and enjoy healthier plants and higher yields season after season 🍅🌱