Tomato Tips in Dutch Bucket help you grow healthier and more productive tomato plants using a hydroponic system, especially when soil growing becomes hard to control. This article focuses on the practical details that actually affect results when growing tomatoes in Dutch buckets, including system setup, bucket spacing, growing media, nutrients, lighting, daily care, and solutions to common problems.
Whether you are just starting with hydroponics, running a greenhouse, or setting up a small indoor system at home, these Dutch bucket tips are designed to help you avoid common mistakes and maintain stable yields throughout the season.
If you are new to Dutch bucket tomato growing and want a full step-by-step overview of the system before applying specific tips, we recommend starting with our Dutch Bucket Tomato Growing Guide, which explains the setup, materials, and system design in detail.
At Greenfuturehydro, we work with Dutch bucket systems every day for both home growers and commercial projects. The recommendations in this guide are based on hands-on growing experience and real production feedback, not theory alone.
How the Dutch Bucket System Supports Tomato Growth


Drip Irrigation and Inert Media for Healthy Roots
In a Dutch bucket system, tomatoes are grown using drip irrigation combined with inert growing media such as perlite or clay pebbles. Instead of soil, the roots sit in a lightweight, well-draining medium that holds moisture while allowing excess nutrient solution to drain away easily. This setup prevents waterlogging and helps maintain a stable root environment, which is especially important for fast-growing tomato plants.
Because the growing media does not contain nutrients, tomatoes receive all their nutrition from the hydroponic nutrient solution. This allows growers to precisely control what the plants absorb at each growth stage, something that is difficult to achieve in soil-based systems.
Recirculating vs Non-Recirculating System Design
Dutch bucket systems for tomatoes can be designed as either recirculating or non-recirculating systems. In a recirculating Dutch bucket system, the runoff nutrient solution is collected, filtered, and reused. This approach improves water and nutrient efficiency and is often preferred in commercial greenhouse tomato production.
Non-recirculating Dutch bucket systems allow excess nutrient solution to drain away instead of being reused. While this method uses more water, it significantly reduces the risk of nutrient imbalance and root diseases. For beginners growing tomatoes in Dutch buckets, non-recirculating systems are often easier to manage and more forgiving.
Root Zone Performance in Dutch Bucket Systems
Tomato roots thrive in environments with strong drainage, high oxygen availability, and consistent nutrient delivery. The Dutch bucket system naturally provides these conditions. The loose structure of perlite or clay pebbles allows air to reach the roots, while the drip irrigation system supplies water and nutrients in controlled amounts.
Unlike soil, which can compact over time and limit oxygen flow, Dutch buckets maintain a well-aerated root zone throughout the growing cycle. This leads to healthier root development, stronger vegetative growth, and more reliable flowering and fruit set in hydroponic tomatoes.
Advantages of Dutch Buckets Compared to Soil
When compared to traditional soil growing, Dutch bucket systems offer greater control over watering, nutrients, and root health. Soil conditions can vary widely due to compaction, uneven moisture, and nutrient lockout, all of which can limit tomato growth and yield.
By contrast, growing tomatoes in Dutch buckets creates a clean and predictable growing environment. This makes it easier to monitor plant health, adjust nutrient levels, and achieve consistent results. For growers aiming for higher yields and better fruit quality, Dutch bucket hydroponics provides a clear advantage over soil-based methods.
Choosing Tomato Varieties for Dutch Bucket Systems
When choosing tomato varieties for Dutch bucket hydroponic systems, fruit size, growth habit, and system stability all play an important role.
| Tomato Variety | Best For | Growth Speed | Difficulty Level | Key Notes for Dutch Bucket Growing |
|---|---|---|---|---|
| Cherry Tomatoes | Beginners, indoor growing, small systems | Fast | Easy | Fast growth, high tolerance to minor nutrient or watering mistakes, ideal for first-time Dutch bucket growers |
| Roma / Plum Tomatoes | Cooking, sauces, processing | Medium | Moderate | Heavier fruit requires strong support, stable drip irrigation and consistent nutrient supply |
| Beefsteak Tomatoes | High yields, commercial or greenhouse growing | Slower | Advanced | Large fruit size demands excellent system stability, precise EC/pH control, and strong trellising |


Determinate vs Indeterminate Growth Habits
When growing tomatoes in a Dutch bucket system, understanding the difference between determinate and indeterminate tomato varieties can make a big difference in long-term results.
Indeterminate tomatoes, also known as vining tomatoes, continue to grow, flower, and produce fruit throughout the season. This growth habit makes them especially well suited for Dutch bucket hydroponic systems. Because Dutch buckets provide consistent water, oxygen, and nutrient delivery, indeterminate tomatoes can maintain steady growth and produce multiple harvests over time. For greenhouse and indoor growers aiming for continuous production and higher overall yields, indeterminate varieties are usually the better choice.
Determinate tomatoes, on the other hand, grow to a fixed height and produce most of their fruit within a shorter period. These varieties can work in Dutch bucket systems when space is limited or when growers prefer a more compact plant with a predictable harvest window. Determinate tomatoes are often used for outdoor or seasonal growing, where a single, concentrated harvest is preferred.
In general, if your goal is long-term production, better yield control, and efficient use of a Dutch bucket system, indeterminate tomatoes are the most suitable option. Determinate varieties still have their place, but they are better suited for specific situations rather than continuous hydroponic tomato production.
Greenhouse Selection Tips for High-Yield Crops
In commercial greenhouse production, indeterminate tomato varieties are generally preferred. Their continuous growth habit allows for long-term harvesting, consistent fruit quality, and maximum yield per plant. When combined with Dutch bucket hydroponic systems, indeterminate tomatoes make it easier to maintain stable production cycles and optimize space, labor, and nutrient efficiency over time.
Setting Up a Dutch Bucket System for Tomatoes
Bucket Size, Layout, and Plant Spacing
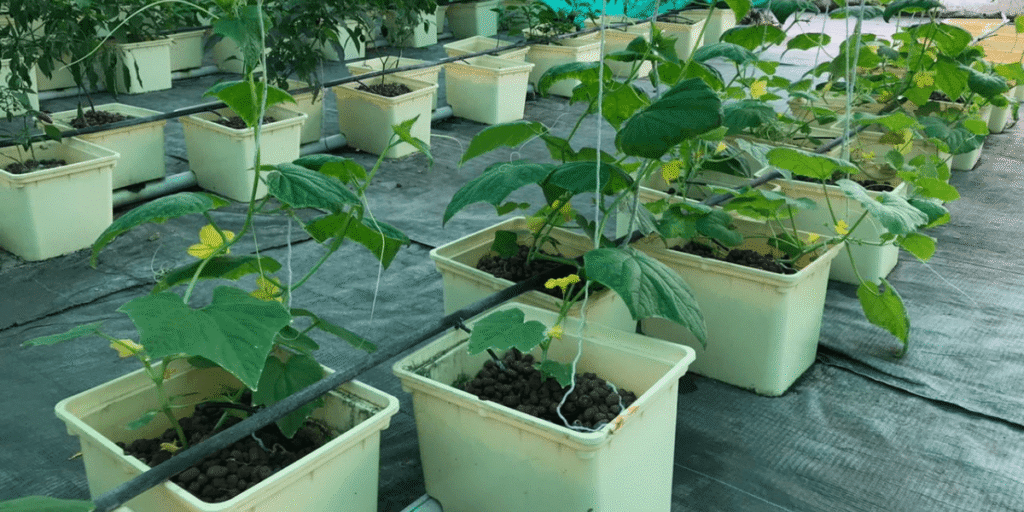
For successful tomato growing in a Dutch bucket system, bucket size, plant spacing, and airflow all work together to influence root health, nutrient uptake, and disease prevention. In most setups, a 10–20L (2.6–5.3 gallon) bucket is ideal for tomatoes, as it provides enough space for strong root development while maintaining excellent drainage and oxygen availability. The best practice is one tomato plant per bucket, since tomatoes have vigorous root systems and sharing a container often leads to uneven growth and nutrient competition.
When arranging your system, place buckets 45–60 cm (18–24 inches) apart to ensure adequate light exposure and reduce canopy crowding as plants mature. Just as important, leave 80–100 cm (31–39 inches) between rows to improve airflow. Proper spacing helps control humidity around the plants, lowers the risk of fungal diseases, and makes pruning, training, and harvesting much easier. Compared to soil-grown tomatoes, this spacing strategy allows Dutch bucket systems to deliver more precise nutrient control, healthier roots, and more consistent yields.
Best Growing Media for Hydroponic Tomatoes
| Growing Medium | Drainage & Oxygen | Water Retention | Suitability for Tomatoes | Notes |
|---|---|---|---|---|
| Perlite | Excellent | Low | ⭐⭐⭐⭐⭐ Ideal | Best for fast growth, strong root oxygenation, and precise nutrient control |
| Coco Coir + Perlite | Very Good | Medium | ⭐⭐⭐⭐☆ | Balanced moisture and airflow, great for greenhouses and warm climates |
| Soil | Poor | High but uneven | ⭐ Not Recommended | Compacts easily, restricts oxygen, increases disease risk |


Quick Takeaway: What Matters Most in Setup
For Dutch bucket tomato growing, inert and well-draining media such as perlite or a coco coir–perlite mix deliver the best results. They support healthy roots, reduce disease pressure, and allow growers to fully benefit from hydroponic nutrient control. Traditional soil removes these advantages and is best avoided in Dutch bucket systems.
Irrigation and Drainage Design for Dutch Buckets
A well-designed drip irrigation and drainage system is essential for keeping tomato roots healthy in a Dutch bucket setup. For most tomato varieties, a drip emitter with a flow rate of 1–2 GPH (3.8–7.6 LPH) per bucket works well. This range delivers consistent moisture without oversaturating the growing media, allowing roots to absorb nutrients efficiently while staying well oxygenated.
Equally important is the drainage outlet height inside the bucket. Setting the drain hole 2–3 cm (0.8–1.2 inches) above the bottom creates a small nutrient reservoir while preventing roots from sitting in stagnant water. This design supports steady nutrient uptake without increasing the risk of root suffocation or disease.
To prevent waterlogging and root rot, always ensure free-flowing drainage lines and avoid using media that compacts over time. A properly balanced drip and drainage system keeps the root zone moist but never flooded, which is one of the main reasons Dutch bucket systems outperform soil-based tomato growing in both yield and consistency.
Nutrient and Water Management for Hydroponic Tomatoes
1. EC and pH Control in Dutch Bucket Systems
In a Dutch bucket system, EC and pH control directly influence tomato growth speed, fruit quality, and overall yield. Because nutrients are delivered straight to the root zone, even small fluctuations can affect plant performance. Keeping EC and pH within the optimal range at each growth stage allows tomatoes to absorb nutrients efficiently and grow more consistently.
Recommended EC & pH Ranges for Tomatoes
Below are general guidelines for EC and pH levels when growing tomatoes in Dutch bucket systems. These ranges help support healthy growth while reducing the risk of nutrient-related issues.
| Growth Stage | EC Range (mS/cm) | pH Range | Why It Matters |
|---|---|---|---|
| Vegetative Growth | 2.0–2.5 | 5.8–6.2 | Supports strong leaf, stem, and root development |
| Flowering & Fruiting | 2.5–3.5 | 5.8–6.3 | Promotes flowering, fruit set, and consistent tomato size |

Greenfuturehydro TDS/EC Water Tester for Hydroponics | Custom Branding
Why EC & pH Matter in Dutch Bucket Systems
Maintaining the correct EC level ensures tomatoes receive enough nutrients without causing salt stress, while proper pH balance keeps key elements like calcium, magnesium, and potassium available to the plant. Poor control often leads to common problems such as nutrient lockout, blossom end rot, and uneven fruit development.
Regular monitoring allows growers to fine-tune their nutrient strategy and fully unlock the yield potential of Dutch bucket tomato growing.
Pro Tip
For best results, check EC and pH daily in commercial systems and after every nutrient adjustment in home Dutch bucket setups.
2. Balancing N–P–K Through Different Growth Stages
In Dutch bucket tomato growing, adjusting the N–P–K ratio at different growth stages is just as important as controlling EC and pH. Tomatoes don’t need the same nutrient balance throughout their life cycle. Matching nutrients to plant demand helps prevent excessive leaf growth, weak flowering, and poor fruit quality.
Early Growth Stage: Focus on Nitrogen
During the vegetative stage, tomatoes need more nitrogen (N) to support leaf, stem, and root development. Proper nitrogen levels help build a strong plant structure capable of supporting heavy fruit later on.
However, too much nitrogen can delay flowering and cause overly lush foliage with limited fruit production.
Flowering & Fruiting Stage: Potassium and Calcium Matter Most
Once flowering begins, nutrient priorities shift. Potassium (K) becomes essential for flower development, fruit size, color, and sugar accumulation. At the same time, calcium (Ca) plays a critical role in cell strength and helps prevent blossom end rot, a common issue in hydroponic tomatoes.
Adjusting the N–P–K ratio at this stage allows Dutch bucket systems to deliver nutrients more precisely, resulting in better fruit set and more consistent yields.
Quick Tip
If plants show excessive leaf growth but few flowers, nitrogen is likely too high.
If fruits develop unevenly or show blossom end rot, check potassium, calcium, and pH stability.
3. Irrigation Frequency and Timing Strategies
In a Dutch bucket system, how often and how you irrigate has a direct impact on root health, nutrient uptake, and overall tomato yield. Compared with soil growing, hydroponic tomatoes respond much more quickly to irrigation mistakes, making proper watering strategy especially important.
Why Pulse Irrigation Works Better Than Continuous Watering
Pulse irrigation delivers nutrient solution in short, controlled intervals rather than a constant flow. This approach allows the growing media to partially drain and re-oxygenate between watering cycles, creating an ideal balance of moisture and oxygen around the roots. For tomatoes, this reduces the risk of root suffocation, nutrient lockout, and salt buildup common problems in continuously watered systems.
Circulating vs Non-Circulating System Management
In circulating Dutch bucket systems, irrigation frequency must be carefully monitored to prevent nutrient solution from overheating or becoming imbalanced as it recycles. Regular EC and pH checks are essential.
In non-circulating systems, each bucket receives fresh nutrient solution, which offers greater stability and lower disease risk, especially for beginners, though it may require more water and nutrients.
Choosing the right irrigation frequency and system type helps ensure healthy root zones, efficient nutrient delivery, and consistent tomato production throughout the growing cycle.
Why You Should Stop Irrigation at Night
In Dutch bucket tomato systems, stopping irrigation at night is a simple but often overlooked practice that plays a big role in root health. During nighttime, tomato plants slow down water and nutrient uptake. Continuing irrigation can cause excess moisture to remain in the growing media, reducing oxygen availability around the roots.
By allowing the root zone to drain and re-oxygenate overnight, you significantly lower the risk of root diseases such as root rot and improve overall root respiration. Healthier roots lead to better nutrient absorption, stronger plant growth, and more stable yields throughout the season.
For most Dutch bucket setups, a well-timed irrigation schedule during daylight hours is more than enough to meet tomato water needs,while nighttime rest helps the root system recover and stay active.
Light, Temperature, and Humidity Requirements
Light and temperature play a critical role in determining tomato yield, fruit quality, and growth speed in Dutch bucket systems. Because hydroponic tomatoes grow faster than soil-grown plants, providing stable lighting and climate conditions becomes even more important, especially for indoor and greenhouse setups.
Daily Light Needs for Fruiting Tomatoes
Tomatoes grown in Dutch bucket systems typically require 12–16 hours of light per day for healthy growth and consistent fruit production. Insufficient light often leads to weak stems, delayed flowering, and reduced yields, while excessive light without proper temperature control can stress the plants.


Indoor vs Greenhouse vs Outdoor Environments
| Growing Environment | Primary Light Source | Supplemental Lighting Needed | Best Use Case |
|---|---|---|---|
| Indoor Growing | Full-spectrum LED grow lights | Required at all times | Ideal for year-round production and fully controlled environments |
| Greenhouse Growing | Natural sunlight + LED grow lights | Needed during cloudy days or winter | Best for high-yield and commercial tomato production |
| Outdoor Growing | Natural sunlight | Optional, seasonal use | Suitable for warm climates and extended growing seasons |
Why LED Grow Lights Work Best for Dutch Bucket Tomatoes
LED grow lights are the most efficient option for Dutch bucket tomato production. Full-spectrum LEDs provide balanced light for both vegetative growth and fruiting, while producing less heat than traditional lighting. This makes temperature management easier and reduces the risk of plant stress.
At Greenfuturehydro, our LED grow lights are designed to deliver uniform coverage and reliable performance for both home growers and commercial tomato operations.


Ideal Temperature, Humidity, and Day–Night Difference
For optimal results, maintain daytime temperatures between 22–26°C (72–79°F) and slightly cooler nights around 18–20°C (64–68°F). A small day–night temperature difference helps stimulate flowering and fruit set.
Relative humidity should stay within 60–70% to support transpiration while minimizing disease pressure.
By balancing light duration, temperature, and humidity, Dutch bucket systems create a controlled environment where tomatoes can thrive consistently and produce high-quality fruit.
Pruning, Training, and Pollination Practices


Proper pruning, training, and pollination are key to getting high yields and consistent fruit quality from Dutch bucket tomatoes. Because hydroponic tomatoes grow faster and more vigorously than soil-grown plants, these practices help keep plants balanced, productive, and easier to manage especially in indoor and greenhouse systems.
Single-Stem and Double-Stem Training Methods
Most Dutch bucket tomato growers choose a single-stem system, where one main stem is trained upward and all side shoots are removed. This approach improves airflow, simplifies nutrient distribution, and makes it easier to control plant height and fruit load.
A double-stem system allows one strong side shoot to develop alongside the main stem. It can increase total yield but requires stronger support and closer monitoring to prevent overcrowding.
For beginners and high-density setups, single-stem training is usually the most reliable option.
Managing Suckers and Plant Structure
Tomato suckers are the small shoots that grow between the main stem and leaf branches. These should be removed regularly while they are still small, ideally once or twice per week. Early pruning helps the plant focus energy on fruit production rather than excessive leaf growth and also improves light penetration and airflow around the plant.
Supporting Vines with Strings and Clips
Dutch bucket tomatoes need strong, reliable support. Vertical strings, stakes, or trellis systems are commonly used to guide plants upward as they grow. Tomato clips are especially useful for gently securing the stem without causing damage. Always leave enough space for stem expansion and adjust supports as the plant grows to avoid stress or breakage.
Pollination Techniques for Indoor and Greenhouses
In indoor and greenhouse environments, natural pollinators are often limited. To ensure good fruit set, gently shake the plant, tap the support strings, or use a small fan to mimic airflow. These simple techniques help pollen move within the flowers and significantly improve fruit development. For more details, see hydroponic pollination.


Commercial Greenhouse Technique: Lean and Lower
In commercial Dutch bucket tomato production, the lean and lower method is widely used. As plants grow taller, the stem is gradually lowered and leaned horizontally along the row while new growth continues upward. This technique allows indeterminate tomato plants to keep producing over a long season without exceeding height limits, making it ideal for high-yield greenhouse operations.
Quick Tip
Consistent pruning and training not only improve yield but also make nutrient management, disease prevention, and harvesting much easier in Dutch bucket systems.
Common Problems in Dutch Bucket Tomato Production
Tomatoes grown in Dutch bucket systems are highly productive, but small management mistakes can quickly lead to visible problems. The table below summarizes the most common Dutch bucket tomato issues, their root causes, and effective solutions.
Quick Troubleshooting Table
| Problem | Main Cause | Practical Solution |
|---|---|---|
| Leaf yellowing | Nitrogen deficiency or pH imbalance | Adjust pH to 5.8–6.3, increase nitrogen gradually |
| Blossom end rot | Poor calcium uptake, unstable EC | Stabilize EC, maintain consistent irrigation |
| Root rot | High water temperature, poor drainage | Improve drainage, keep water below 24°C |
| Algae growth | Light exposure to nutrient solution | Use opaque buckets and pipes, block light |
| Fruit drop / poor fruit set | Temperature stress, weak pollination | Improve airflow, assist pollination |
1. Yellowing Leaves and Nutrient Imbalances
What’s really happening:
In Dutch bucket systems, yellowing leaves are most often caused by nitrogen uptake issues rather than a true lack of nutrients. This usually happens when pH slowly drifts out of range or when EC fluctuates too quickly after nutrient adjustments.
Early warning signs:
- Older leaves turning pale green before yellowing
- Slower vegetative growth despite regular feeding
How to fix it:
- Keep pH consistently between 5.8–6.3
- Adjust EC gradually (no more than 0.2–0.3 per day)
- Increase nitrogen slightly during early vegetative growth, not all at once
2. Blossom End Rot and Calcium Uptake
What’s really happening:
Blossom end rot in hydroponic tomatoes is almost always a calcium transport problem, not a calcium deficiency. In Dutch buckets, irregular irrigation cycles or EC spikes restrict calcium movement within the plant.
Early warning signs:
- Young fruits showing dark, water-soaked spots
- Thick, healthy leaves but poor fruit quality
How to fix it:
- Maintain consistent drip irrigation cycles
- Avoid EC spikes above the crop’s comfort zone
- Keep pH stable to support calcium mobility


3. Root Rot and Oxygen Management
What’s really happening:
Root rot develops when Dutch buckets stay too wet for too long, especially in warm conditions. Poor drainage or warm nutrient solution reduces oxygen availability around the roots.
Early warning signs:
- Roots turning light brown instead of white
- Plants wilting even when the media is moist
How to fix it:
- Use pulse irrigation rather than constant drip
- Stop irrigation during night hours
- Keep nutrient solution below 24°C (75°F)


4. Algae Growth in Buckets and Lines
What’s really happening:
Algae growth is a light management issue, not a nutrient issue. When light enters buckets or irrigation lines, algae competes for oxygen and clogs the system over time.
Early warning signs:
- Green film inside buckets or tubing
- Slippery surfaces and reduced water flow
How to fix it:
- Use opaque Dutch buckets and tubing
- Cover exposed media surfaces
- Clean the system regularly to prevent buildup
5. Flower Drop and Poor Fruit Set
What’s really happening:
In controlled environments, flower drop is often caused by heat stress, weak airflow, or insufficient pollination, especially in indoor or greenhouse Dutch bucket setups.
Early warning signs:
- Flowers drying up and falling without setting fruit
- Strong vegetative growth but low fruit count
How to fix it:
- Maintain a clear day–night temperature difference
- Improve air circulation around flowering clusters
- Assist pollination manually or with gentle vibration


Pro Tip for Dutch Bucket Growers
Most tomato problems are not caused by a single mistake, but by EC, pH, irrigation, and temperature drifting slightly out of balance. Regular monitoring and early correction are the most effective prevention strategies.
Harvesting Tips for Dutch Bucket Tomatoes


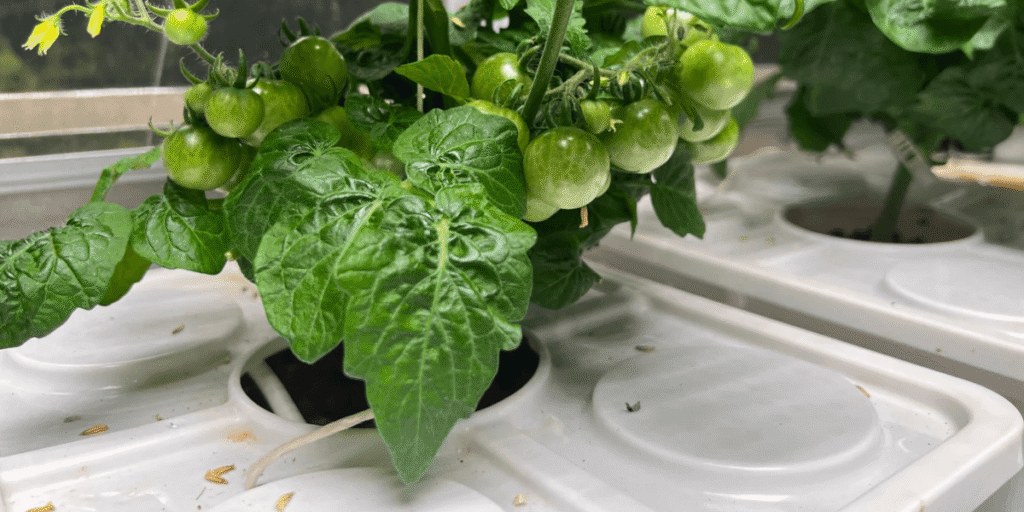
Harvesting at the right time is essential for achieving optimal flavor, extended shelf life, and continuous production when growing tomatoes in Dutch bucket systems. Proper harvesting techniques also help maintain plant balance and support long-term yields in hydroponic tomato production.
Best Time to Harvest Dutch Bucket Tomatoes
For the best flavor and texture, tomatoes should be harvested when they reach full color maturity but remain firm to the touch. In Dutch bucket hydroponic systems, tomatoes often ripen faster than soil-grown plants due to precise nutrient and water control. Harvesting too early reduces sugar content, while delayed harvesting can weaken the plant and reduce future fruit production.
Continuous Harvesting vs One-Time Harvesting
Continuous harvesting is strongly recommended for Dutch bucket tomato systems, especially when growing indeterminate tomato varieties. Regular removal of ripe fruits encourages ongoing flowering and fruit set, leading to higher total yields over the growing season.
One-time harvesting may be suitable for determinate varieties or short-cycle production, but it typically results in lower overall productivity and reduced system efficiency.
Post-Harvest Management for Sustained High Yields
Effective post-harvest management helps Dutch bucket tomato plants recover quickly and continue producing. After harvesting, remove damaged fruits and unnecessary foliage to improve airflow and reduce disease pressure. Maintaining stable EC, pH, and irrigation schedules after harvest is critical for supporting continuous fruit development and preventing plant stress.
Consistent harvesting combined with proper post-harvest care is a key strategy for maintaining high-yield tomato production in Dutch bucket systems.
Harvesting Best Practices Summary
- Harvest tomatoes at full color for best flavor
- Use continuous harvesting to maximize yield
- Maintain stable nutrient and irrigation levels after harvest
- Remove damaged fruit to support plant health


Common Questions About Growing Tomatoes in Dutch Buckets
Yes. The Dutch bucket system is one of the best hydroponic systems for tomatoes, especially for fruiting crops. It provides excellent drainage, high root-zone oxygen levels, and precise nutrient control, making it ideal for both home growers and commercial tomato production.
The best practice is one tomato plant per Dutch bucket. This allows each plant enough root space, nutrients, and airflow. Planting more than one tomato per bucket often leads to overcrowding, nutrient competition, and lower overall yields.
The best nutrient solution for Dutch bucket tomatoes is a balanced hydroponic tomato formula designed for fruiting crops. It should provide sufficient nitrogen during vegetative growth and higher potassium and calcium during flowering and fruiting, while maintaining stable EC and pH levels.
Yes, tomatoes can be successfully grown indoors using Dutch bucket systems, as long as proper lighting and climate control are provided. Full-spectrum LED grow lights, stable temperatures, and good airflow are essential for indoor hydroponic tomato production.
Tomatoes in Dutch bucket systems are typically watered multiple times per day using pulse irrigation. Short, frequent watering cycles during daylight hours help maintain moisture while allowing oxygen to reach the roots. Nighttime irrigation is usually avoided to prevent root problems.
For tomatoes, Dutch bucket systems are generally better than DWC. Dutch buckets offer superior root support, drainage, and oxygenation for large, fruiting plants. DWC systems can work but require more careful oxygen and temperature management, making them less forgiving for tomatoes.
Is the Dutch Bucket System Right for Growing Tomatoes?
Yes. For most growers, Dutch bucket systems are one of the best options for growing tomatoes in hydroponics.
Their main advantages are clear: stable root conditions, easy scalability, and consistently high yields. Strong drainage and oxygenation support healthy roots, while precise nutrient control makes tomato growth more predictable across different environments.
For beginners, Dutch buckets offer a controlled and forgiving way to learn hydroponic tomato growing. For commercial growers, they provide long-term productivity and efficient system expansion.
When applied correctly, tomato growing tips in Dutch bucket systems deliver reliable results for both small-scale and commercial production.
Ready to Grow Tomatoes in a Dutch Bucket System?
Ready to apply these tomato growing tips in a Dutch bucket system?
Greenfuturehydro provides reliable Dutch bucket systems, grow lights, and nutrient solutions designed for stable growth and consistent tomato yields from small home setups to commercial greenhouses.
Have a question about Dutch bucket tomato growing?
What’s the biggest challenge you’ve faced so far? Share it in the comments.
📩 info@greenfuturehydro.com
📞 +86 13487543942
Follow us on Instagram @Greenfuturehydro for practical hydroponic tomato tips.